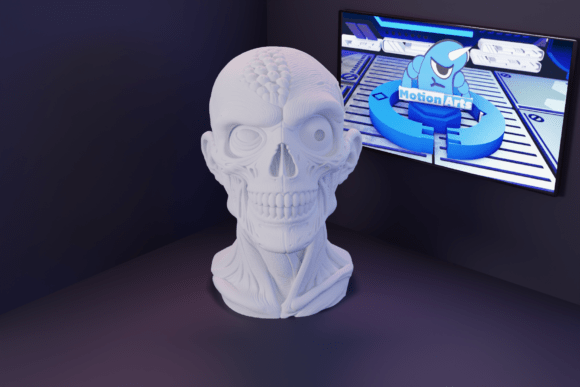
Zombie Head: A Comprehensive Guide to 3D Printing Spooky Realism
The allure of the macabre has always held a unique place in pop culture, from classic horror cinema to modern video games. For makers, collectors, and enthusiasts of the grotesque, few projects offer as much creative satisfaction as bringing a Zombie Head to life through additive manufacturing. This digital asset is not merely a static object; it is a canvas for artistic expression, a test of technical printing prowess, and a centerpiece for immersive storytelling. Whether you are preparing for Halloween, building a detailed diorama, or expanding a collection of horror-themed miniatures, understanding how to effectively utilize a Zombie Head STL model can transform a simple print into a striking work of art.
Understanding the Appeal of Digital Horror Models
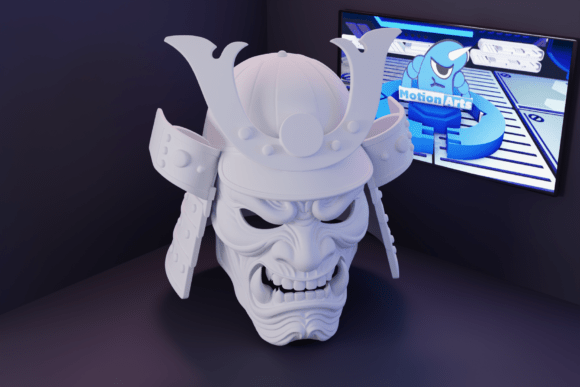
At its core, a Zombie Head STL file represents a convergence of digital sculpting and physical fabrication. Unlike mass-produced plastic decorations found in seasonal aisles, a 3D printed zombie offers customization and realism that off-the-shelf items rarely achieve. The primary value lies in the detail. High-quality STL files capture the terrifying nuances of decay—sunken eye sockets, exposed teeth, and textured skin lesions—that make the piece feel authentic and impactful.
For many users, the goal is not just ownership, but creation. The process allows for a level of engagement that passive consumption cannot match. By downloading and printing a Zombie Head, you are participating in the final stage of the artistic process. This sense of agency is crucial for hobbyists who value uniqueness. You are not buying a generic product; you are manufacturing a specific vision of terror tailored to your aesthetic preferences.
Overcoming Common Printing Challenges
While the concept is straightforward, executing a high-quality print of a complex organic shape like a zombie head presents specific technical challenges. Recognizing these hurdles early ensures a smoother workflow and a superior final result.
- Support Structures: Organic shapes often feature overhangs, such as jutting jawlines, noses, or ear structures. Without proper support generation in your slicer software, these areas may sag or fail entirely. It is essential to review the model in your slicer before printing to determine where tree supports or linear supports are necessary.
- Layer Adhesion and Orientation: The orientation of the Zombie Head on the build plate significantly affects surface quality. Printing vertically may minimize support contact points on the face but could introduce layer lines across prominent features. Conversely, printing horizontally might offer better structural integrity for the neck base but require extensive post-processing to remove support marks from the facial details.
- Resolution Settings: To capture the "terrifying details" mentioned in the model description, standard draft settings are often insufficient. Using a finer layer height, such as 0.1mm or 0.12mm, helps preserve the subtle textures of decaying flesh, making the piece look more realistic and less like a layered plastic object.
It is important to remember that this is a digital 3D model, often AI-generated or digitally sculpted. Actual printed results will vary depending on your specific printer hardware, filament type, and slicer configurations. There is no one-size-fits-all setting; experimentation is part of the journey.
Practical Applications and Creative Uses
Once successfully printed, the Zombie Head serves multiple purposes beyond simple display. Its versatility makes it a valuable asset for various creative projects.
Halloween and Seasonal Decor
The most immediate application is seasonal decoration. A painted Zombie Head can serve as a haunting centerpiece for a mantlepiece, a shocking prop for a haunted house attraction, or part of a larger tablescape. Because it is 3D printed, you can scale the model to fit your specific space, creating anything from a miniature desk ornament to a life-sized horror prop if your printer capacity allows.
Dioramas and Tabletop Gaming
For tabletop gamers and diorama builders, the Zombie Head adds narrative depth. In wargaming scenarios, scattered remains or defeated enemies enhance the battlefield's storytelling. When integrated into a larger scene, such as a post-apocalyptic cityscape or a graveyard setting, the head provides a focal point that draws the viewer’s eye and establishes tone. The realism of the STL file ensures that it blends seamlessly with other high-detail miniatures.
Artistic Practice and Painting
For painters, a Zombie Head is an excellent practice subject. The varied textures—smooth bone, rough skin, wet eyes, and dry cracks—require different painting techniques. Artists can experiment with washes, dry brushing, and weathering effects to achieve a lifelike appearance. This makes the model a valuable educational tool for those looking to improve their miniature painting skills.
Tailoring the Approach to Your Needs
Different users will approach the Zombie Head model with distinct goals, and understanding these perspectives can help you maximize the utility of the file.
The Collector: If you are a collector, your priority is likely aesthetic fidelity and display quality. You may invest in high-end resins (SLA/DLP printing) to achieve smooth surfaces and intricate details. Your focus will be on meticulous post-processing, sanding, and professional-grade painting to create a museum-quality piece.
The Casual Hobbyist: For those new to 3D printing, the goal might be fun and accessibility. Using an FDM printer with standard PLA filament, you might prioritize ease of printing over microscopic detail. The satisfaction comes from seeing the object take shape and perhaps applying a simple paint job or leaving it in its raw state for a gritty, industrial look.
The Content Creator: Photographers and video creators may use the Zombie Head as a prop for stop-motion animation, horror short films, or social media content. In this context, lighting and camera angles become key. The model’s realistic details catch light dramatically, allowing for compelling visual storytelling without the need for expensive special effects makeup or prosthetics.
Recommendations for Best Results
To ensure your project meets expectations, consider the following recommendations:
- Inspect the File: Before slicing, open the STL in a viewer to check for mesh errors. Watertight models print more reliably.
- Choose the Right Material: For FDM printers, PLA is easy to print, but PETG offers better durability if the prop will be handled frequently. For resin printers, standard grey resin highlights details well, while skin-tone resins can reduce the amount of painting required.
- Post-Processing is Key: Do not underestimate the power of cleaning and curing. Remove support marks carefully with flush cutters and sandpaper. A primer coat can help unify the surface and reveal any remaining imperfections before final painting.
- Experiment with Lighting: When displaying your Zombie Head, use directional lighting to accentuate the shadows in the eye sockets and wrinkles. This enhances the spooky atmosphere and highlights the model's depth.
In conclusion, the Zombie Head STL model is more than just a digital file; it is a gateway to creative exploration. By understanding the technical requirements, embracing the challenges of printing, and applying thoughtful post-processing, you can create a piece that is both visually striking and personally satisfying. Whether for Halloween decor, gaming, or artistic practice, this model offers a versatile and engaging project for makers of all skill levels.