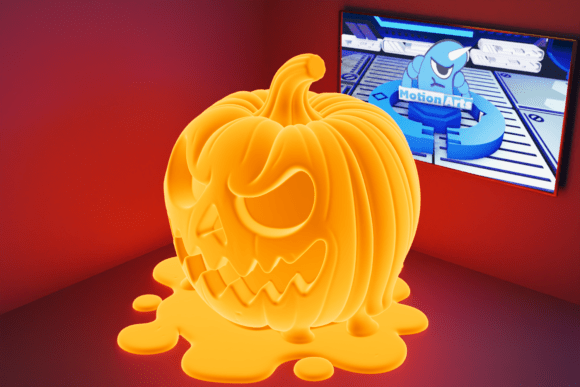
Melting Pumpkin: Integrating Stylized 3D Assets into Your Halloween Production Workflow
In the realm of seasonal decor and digital fabrication, the difference between a generic decoration and a memorable piece often lies in the specificity of the design. The Melting Pumpkin represents a shift away from traditional, rigid jack-o'-lantern aesthetics toward something more fluid, dynamic, and visually arresting. For creators, small business owners, and hobbyists utilizing 3D printing technology, this asset is not merely a decorative item; it is a case study in how specialized digital models can enhance thematic storytelling and production efficiency.
Integrating a model like the Melting Pumpkin into your workflow requires an understanding of both the artistic intent and the technical constraints of additive manufacturing. Whether you are preparing for a haunted house display, curating a collection of creepy art, or producing limited-edition seasonal products, the process begins with selecting the right digital asset and ends with a high-quality physical object. This article explores how to effectively incorporate this STL file into your creative and operational processes, ensuring consistent results and maximum visual impact.
Understanding the Asset and Its Strategic Fit
The Melting Pumpkin is defined by its stylized degradation. Unlike standard pumpkins that rely on symmetrical carving, this model features a "melting" effect, combining a fun expression with a dark, sinister touch. This duality makes it versatile for various applications, from playful family-friendly decorations to more intense, horror-themed dioramas.
From a procurement perspective, knowing that this is an AI-generated 3D design is crucial for setting expectations. AI-generated models often possess complex organic geometries that can be challenging to replicate manually. However, they may also require additional cleanup or support planning compared to human-engineered meshes. Recognizing this helps in allocating time for pre-print preparation. The asset is provided in STL format, the industry standard for 3D printing, ensuring compatibility with a wide range of slicing software and hardware.
Pre-Production: Compatibility and Slicer Preparation
Before sending any file to the printer, a thorough assessment of compatibility is essential. The Melting Pumpkin is designed to be compatible with both FDM (Fused Deposition Modeling) and resin (SLA/DLP) printers. However, the approach to slicing differs significantly between these two technologies, impacting both time and material usage.
FDM Printer Considerations
For those using filament-based printers, the "fluid design" of the melting pumpkin presents specific challenges. Overhangs and bridging areas inherent in the melting effect require careful attention. The documentation notes that support is required. In your slicing software, you should prioritize generating tree supports or organic supports rather than standard linear supports. Tree supports conform better to irregular shapes and are easier to remove without damaging the delicate "dripping" details of the pumpkin’s surface.
Layer height plays a critical role in the final aesthetic. To capture the smooth transition of the melting wax-like texture, a layer height of 0.15mm to 0.2mm is recommended for standard nozzles. Going too coarse may result in visible stepping artifacts that break the illusion of fluidity. Additionally, ensure your infill density is sufficient—typically 15-20%—to provide structural integrity to the base, preventing warping during the print process.
Resin Printer Advantages
If high-detail output is the primary goal, resin printing offers superior surface finish. The Melting Pumpkin’s intricate expressions and subtle contours benefit from the higher resolution of SLA printers. When preparing the model for resin, orientation is key. Positioning the pumpkin to minimize the cross-sectional area of each layer can reduce suction forces and potential print failures. Supports should be placed strategically on flat surfaces or less visible areas to minimize post-processing sanding. Given the "beginner" difficulty level, this model is forgiving, but resin users must still account for curing times and proper ventilation during post-processing.
Integration into Creative Workflows
Once the technical parameters are set, the next phase involves integrating the printed object into your broader creative or business workflow. The utility of the Melting Pumpkin extends beyond standalone display.
Thematic Decor and Dioramas
For set designers and hobbyists creating spooky dioramas, the Melting Pumpkin serves as a focal point. Its unique shape allows it to anchor a scene, suggesting a narrative of decay or magical transformation. When incorporating it into a larger setup, consider lighting. The hollow interior or translucent sections (if printed with specific materials) can accommodate LED tea lights or small electronics. Using warm orange or eerie green LEDs can enhance the "sinister charm" mentioned in the product description, casting dynamic shadows that emphasize the melting contours.
Product Development for Small Businesses
Entrepreneurs and makers selling seasonal goods can use this model as part of a limited-time offer. Because the design is distinct from mass-produced plastic decorations, it appeals to collectors of "creepy art." To streamline production, batch printing is recommended. Arrange multiple instances of the model on the print bed to maximize throughput. Consistency in color and finish is vital here; establishing a standardized post-processing routine—such as uniform priming and painting techniques—ensures that every unit meets quality control standards. This repeatability is essential for maintaining brand reputation and customer satisfaction.
Educational and Workshop Applications
Educators and workshop leaders can utilize the Melting Pumpkin as a teaching tool for 3D printing fundamentals. Its "beginner" level classification makes it accessible for students new to CAD or slicing software. Instructors can use it to demonstrate the importance of support structures, orientation, and the differences between FDM and resin outputs. By analyzing the print results, learners gain practical insights into how digital geometry translates to physical objects, fostering a deeper understanding of additive manufacturing principles.
Post-Processing and Quality Control
The final stage of the workflow involves post-processing, which significantly influences the perceived quality of the Melting Pumpkin. Regardless of the printing method used, removing supports carefully is the first step. For FDM prints, use flush cutters to snip supports close to the model, then sand any remaining nubs with fine-grit sandpaper. For resin prints, wash the model in isopropyl alcohol and cure it under UV light according to the resin manufacturer’s guidelines.
Painting offers an opportunity to enhance the model’s character. A base coat of orange, followed by dry brushing with lighter shades, can highlight the raised areas. Conversely, washing a darker tone into the recesses can accentuate the depth of the melting effect. Sealants should be applied to protect the finish, especially if the item will be handled frequently or displayed outdoors. Consistent application of sealant ensures longevity and maintains the visual integrity of the piece over time.
Long-Term Use and Asset Management
From a digital asset management perspective, storing the STL file in an organized library allows for easy retrieval in future seasons. Tagging the file with metadata such as "Halloween," "Pumpkin," "Melting," and "Beginner" facilitates quick searchability. Keeping a record of successful slicer settings—such as support patterns, layer heights, and temperatures—creates a reference guide that reduces trial and error in subsequent prints. This documentation is invaluable for scaling production or training new team members.
Furthermore, acknowledging the disclaimer that this is an AI-generated design means staying adaptable. If minor mesh errors are encountered, having basic mesh repair tools ready can save a print job. Understanding that actual printed results may vary depending on printer calibration and material properties encourages a mindset of continuous improvement and experimentation.
Conclusion
The Melting Pumpkin is more than a novelty item; it is a versatile component in the toolkit of modern creators. By approaching its production with a structured workflow—from careful slicer preparation to strategic integration into decorative or commercial projects—you can maximize its potential. Whether you are aiming for a striking visual centerpiece or a consistent product line, the key lies in balancing technical precision with creative vision. Download, print, and refine your process to fully realize the sinister charm of this unique Halloween asset.