Integrating the Christmas Truck Ornament SVG into Your Holiday Production Workflow
The holiday season places unique demands on creators, small business owners, and hobbyists alike. Whether you are managing a seasonal product launch for an Etsy shop or crafting personalized gifts for friends and family, efficiency and quality are paramount. In this context, digital assets like the Christmas Truck Ornament SVG serve as more than just decorative files; they are foundational components of a streamlined creative process. By understanding how to effectively integrate this specific design into your workflow, you can reduce production time, ensure consistency across batches, and elevate the perceived value of your final physical products.
This article explores the practical application of the Christmas Truck House Ornament SVG within a broader manufacturing or crafting ecosystem. We will examine preparation strategies, machine compatibility, assembly techniques, and quality control measures that help transform a digital download into a tangible, high-quality holiday item.
Understanding the Asset: Design Structure and Versatility
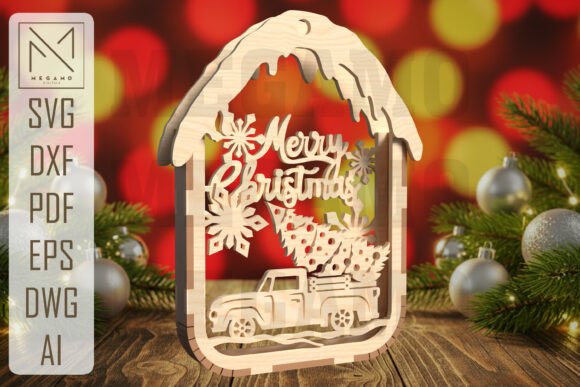
Before importing any file into your cutting software, it is essential to understand its structural composition. The Christmas Truck Ornament SVG features a multilayer design depicting a vintage pickup truck carrying a decorated Christmas tree under a snowy roof, accompanied by a “Merry Christmas” message. This complexity offers aesthetic depth but requires careful handling during the production phase.
The "multilayer" aspect is critical for workflow planning. Unlike single-layer silhouettes, this design relies on the stacking of distinct elements to create a three-dimensional effect. For laser cutting users, such as those operating Glowforge machines, this means accounting for varying depths and potential shadow lines. For blade-based cutters like Cricut or Silhouette, it implies precise weeding and layer alignment. Recognizing these requirements early allows you to allocate sufficient time for post-processing, which is often where bottlenecks occur in holiday production schedules.
Furthermore, the farmhouse-style aesthetic of the truck aligns with current market trends. Integrating this design into your inventory or gift list taps into a popular visual language that resonates with consumers seeking nostalgic, rustic charm. Understanding this positioning helps in deciding where this asset fits best—whether as a standalone ornament, part of a larger garland, or an embellishment on packaging.
Preparation and File Compatibility
A smooth workflow begins with proper file management. The download package typically includes multiple formats: SVG, DXF, PDF, EPS, DWG, and AI. Selecting the correct format for your specific hardware is the first step in preventing technical errors.
- SVG (Scalable Vector Graphics): Ideal for most web-based cutting software like Cricut Design Space and Silhouette Studio. It preserves vector paths without unnecessary metadata.
- DXF (Drawing Exchange Format): Often preferred for older versions of Silhouette Studio or specific CNC workflows that require simpler geometric data.
- AI and EPS: Best suited for professional designers using Adobe Illustrator or CorelDRAW who may need to edit anchor points, adjust kerning, or modify layers before sending the job to a laser cutter.
- PDF: Useful for manual reference or printing templates if you are experimenting with paper prototypes before committing to expensive materials.
Upon downloading, organize these files into a dedicated project folder. Label them clearly, perhaps noting the intended machine (e.g., “Truck_Ornament_SVG_Cricut”). This simple organizational habit prevents version control issues when you are working under tight deadlines. Additionally, always open the file in your design software to verify that all layers are separated correctly. Some software may group elements automatically; ungrouping them ensures you can assign different cut settings to each layer if necessary.
Machine Setup and Material Selection
The choice of material significantly impacts the final outcome of the Christmas Truck Ornament SVG. For a classic look, wood veneers or plywood are excellent choices for laser cutters, providing natural grain contrast between the truck body and the snow layers. For blade cutters, cardstock, acrylic, or layered vinyl offer vibrant color possibilities.
When preparing your machine, consider the following implementation tips:
- Test Cuts: Always perform a test cut on a scrap piece of your chosen material. This verifies pressure settings for blade cutters or power/speed settings for lasers. The intricate details of the Christmas tree and the truck’s grille require precision; incorrect settings can lead to tear-outs or incomplete cuts.
- Layer Registration: If you are using multiple colors or materials, ensure your mat alignment is consistent. For Cricut users, utilizing the “Print then Cut” feature is not applicable here since this is a cut-only file, but using grid lines on your mat can help maintain orientation across multiple sheets.
- Weeding Strategy: For designs with small negative spaces, such as the windows of the truck or the gaps in the tree branches, use a sharp weeding tool. Applying a light layer of transfer tape before weeding can sometimes help hold delicate pieces in place, though this depends on the material stiffness.
Efficiency in this stage comes from batching. If you are producing multiple ornaments, arrange the SVG copies on your virtual canvas to maximize material usage. Nesting the parts closely reduces waste and minimizes the number of times you need to reload your machine, thereby increasing throughput.
Assembly and Quality Control
The assembly phase is where the 3D effect of the Christmas Truck Ornament SVG comes to life. This stage requires patience and attention to detail. Because the design features a snowy roof and a layered tree, the order of assembly matters. Typically, you would start with the base layer—the truck body—and progressively add the subsequent layers, ensuring that each piece aligns perfectly with the one beneath it.
Use a high-quality adhesive suitable for your materials. For wood, a thin application of wood glue provides a strong bond without excessive squeeze-out. For paper or cardstock, double-sided adhesive sheets or precision liquid glue work best. Avoid using hot glue guns for intricate layers, as the bulk of the glue can misalign the delicate pieces and create visible lumps.
Quality control should be integrated into the assembly process. Inspect each ornament for:
- Alignment: Ensure the “Merry Christmas” text is centered and straight relative to the truck.
- Cleanliness: Remove any stray adhesive residues or pencil marks used for alignment.
- Structural Integrity: Gently test the bond between layers to ensure they will withstand handling during shipping or hanging.
If you are creating these for sale, consider adding a protective coating, such as a matte sealant for wood or a clear spray for paper, to enhance durability and longevity. This adds a professional finish that justifies a higher price point and ensures customer satisfaction.
Integration into Broader Projects
The utility of the Christmas Truck Ornament SVG extends beyond standalone decorations. Consider how this asset can interact with other products in your lineup. For example, these ornaments can be attached to gift tags for a cohesive packaging experience. They can also be scaled up to create wall decor or centerpieces, demonstrating the scalability of vector files.
For educators or workshop leaders, this design serves as an excellent teaching tool for layering techniques and spatial reasoning. Breaking down the assembly process into steps allows students to understand how 2D designs translate into 3D objects. For marketers, showcasing the behind-the-scenes assembly process on social media can engage audiences and highlight the craftsmanship involved, adding value to the brand narrative.
Ultimately, the success of using the Christmas Truck Ornament SVG lies in treating it as part of a system. From file selection and machine setup to assembly and final presentation, each step influences the next. By approaching this digital asset with a process-oriented mindset, you ensure that your holiday projects are not only charming but also professionally executed and efficiently produced.
Remember, this is a digital download; no physical item will be shipped. Therefore, the responsibility for quality lies entirely in your execution. By mastering the workflow surrounding this SVG, you turn a simple file into a versatile tool for creative and commercial success during the holiday season.