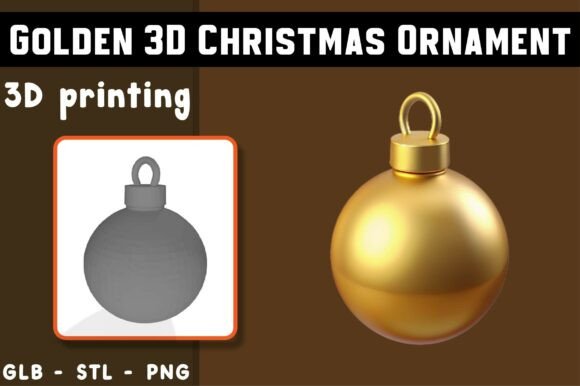
Golden Christmas Ornament 3D Model: A Guide to Quality and Usability
The holiday season is synonymous with warmth, tradition, and the sparkle of decorations that bring a home to life. Among these, the Golden Christmas Ornament 3D Model stands out as a digital asset designed to capture that specific festive magic. However, moving from a digital file to a physical object—or even a polished digital render—requires more than just a simple download. Many creators, hobbyists, and small business owners rush into printing or rendering without fully understanding the nuances of the file they have acquired. This often leads to wasted filament, poor surface finishes, or visuals that fail to meet professional standards.
This guide aims to correct common misconceptions and provide practical advice on how to get the most out of this specific 3D model. Whether you are a beginner looking to print your first decoration or a marketer seeking high-quality assets for a campaign, understanding the technical and aesthetic details is crucial for success.
Understanding the Asset Beyond the Hype
At its core, this model is described as capturing a "magical moment" with expressive details and story-rich charm. While the marketing language is evocative, the practical reality is that you are working with a geometric mesh designed for specific outputs. The Golden Christmas Ornament 3D Model is not just a static image; it is a versatile tool provided in multiple formats, including STL, OBJ, and PNG. Each format serves a distinct purpose, and misunderstanding their roles is the first mistake many users make.
The STL file is your primary resource for physical creation. It contains the geometry necessary for 3D printers to slice and build the object layer by layer. The OBJ file, on the other hand, is ideal for digital showcases, augmented reality (AR) applications, or further editing in 3D software. The included PNG is merely a reference—a rendered image to show you what the final product could look like under ideal lighting conditions. Confusing the PNG for a printable file or expecting the OBJ to print directly without conversion can halt your workflow immediately.
Common Pitfalls in Printing and Preparation
One of the most frequent errors involves ignoring the specific requirements of the printer and slicer settings. The model features clean geometry designed for easy slicing, but "easy" does not mean "automatic." Beginners often assume that because a model is labeled as beginner-friendly, it will print perfectly on default settings. This is a dangerous assumption. Print results vary significantly depending on your hardware, the type of filament used, and your orientation choices.
Orientation Matters
Printing a spherical or ornate object like a golden ornament requires careful consideration of orientation. Placing the model flat on the build plate might seem intuitive, but it can lead to excessive support structures that mar the surface finish. Conversely, printing it at an angle might reduce supports but increase the risk of layer shifting if the adhesion is not secure. Always preview the STL file in your slicer software before committing to a print. Look for overhangs that exceed your printer’s capabilities and adjust accordingly.
Support Structures and Surface Quality
The disclaimer notes that supports may be required. Ignoring this can result in failed prints where delicate details collapse under their own weight. However, using too many supports can leave unsightly marks on the golden surface, requiring extensive post-processing. A better approach is to use tree supports or customized support blockers in your slicer to protect the visible faces of the ornament while still providing structural integrity where needed.
Digital Usage and Visual Presentation
For marketers, bloggers, and digital artists, the Golden Christmas Ornament 3D Model offers a way to create stunning visuals without the cost of physical photography. Yet, a common oversight is failing to optimize the OBJ or GLB files for their intended platform. High-polygon models may look great in a render but can crash web-based AR viewers or slow down interactive displays.
If you are using this model for digital showcasing, ensure you understand the polygon count and texture requirements of your target platform. The clean geometry mentioned in the features is a benefit, but it still requires proper lighting and material setup to achieve that "golden" look. Simply importing the model into a scene without adjusting the metallic properties or roughness values will result in a dull, plastic-like appearance rather than the luxurious gold finish implied by the name.
Evaluating Value and Expectations
When downloading or purchasing digital assets, it is essential to manage expectations regarding what is included. This is an AI-assisted 3D design, which means it leverages modern tools for efficiency. However, it is not a physical item. No matter how realistic the PNG reference looks, you will not receive a tangible ornament in the mail. This distinction is vital for consumers who may be unfamiliar with digital marketplaces.
Furthermore, slight variations between the rendered image and your final print or render are normal. Factors such as printer calibration, filament color consistency, and lighting conditions in your digital scene will all influence the outcome. Expecting an exact replica of the promotional image without putting in the effort to tune your settings is a recipe for disappointment.
Practical Steps for Success
To ensure you get the best results from the Golden Christmas Ornament 3D Model, follow these corrective steps:
- Verify File Integrity: Before slicing, open the STL in a viewer to check for manifold errors or holes in the mesh. Clean geometry should be watertight.
- Test Print Small: If you are unsure about settings, print a small section or a scaled-down version to test adhesion and support removal.
- Choose the Right Material: For a golden look, consider using gold-colored PLA or PETG. Alternatively, print in a neutral color and use metallic spray paint for a more uniform finish.
- Optimize Digital Assets: If using the OBJ for web or AR, compress the file and optimize textures to ensure smooth performance across devices.
- Read the Disclaimer: Acknowledge that variations are part of the process. Use the PNG as inspiration, not as a guaranteed output specification.
By approaching this model with a clear understanding of its technical requirements and limitations, you can avoid common frustrations. Whether you are adding a touch of wonder to your physical holiday decor or enhancing your digital portfolio, the key lies in preparation and attention to detail. The Golden Christmas Ornament 3D Model is a powerful tool, but like any tool, its effectiveness depends on the skill and care of the user.
Remember, the goal is not just to produce an object or an image, but to create a sense of magic and quality. Take the time to learn your slicer, experiment with lighting, and respect the nuances of the file formats provided. In doing so, you transform a simple digital download into a meaningful addition to your collection or project.